Needle-Felting Basics
Many people contact me with questions about needle-felting and how to start. Hopefully, this page will answer all of the basic questions about fiber, tools, time and starter projects. If you'd like to learn the techniques for basic felting, click here.
Understanding the Time Element in Needle-Felting
Needle-felting is a fun hobby, but it is certainly more of an art than a craft. Felting has endless possibilities, but it is time consuming. This is not an art that results in "instant gratification" projects. There are some books available with 1-4 hour projects, but that is not serious needle-felting. Those are great projects for getting started and learning the basics, but if you would like to do some serious felting make sure that you understand the time involved.
To make a doll it takes me an average of 55 to 70 hours of actual felting time. Of course, I worked up to that. The first dolls that I made were less involved with fewer details and took less time to complete. Saying that a doll took "60 hours" to someone doesn't sound like much, because they think of that as a few days' time. For me, that usually translates into about three months on a project, since I only do this in the evenings.
How I Got Started
The best way to start with needle-felting is to work on a few small projects. This allows you to get the hang of things without being discouraged by a lack of results. I felted some small projects for about two years before I ever started felting detailed dolls. I'd always wanted to make a doll, but the time involved seemed daunting. Then came the day that Mom, my sister and I were in a really bad car crash. Both my feet and a leg were broken, so I had a lot of "sitting down" time on my hands. During those months, God blessed me in many ways, but one of the unforeseen blessings came to me through my needle-felting. I had lots of time to attempt more detailed projects, and I've been hooked on felting dolls ever since!
Starter Projects and Ideas
Miniature animals tend to make good starter projects. Sheep are nice, because their bodies are pretty simple, and the curly fluff is quite forgiving! Birds are also a good place to start. These projects take about four hours to complete, and they have a lot of variety. I used a how-to book called Wool Pets (by Laurie Sharp) to learn all of the felting basics. This books includes a variety of animals and step-by-step photo instructions for each project. The final project is even a small gnome doll (my first one was based on this book). There are also quite a few online tutorials available (e.g., via YouTube and personal sites/blogs) for nice beginner projects.
One great thing about needle-felting is that there is no "right way" or "wrong way" to do it. There are no patterns and no "rules". While there are some basic techniques to felting, there is no certain way to create a felted project. Making some beginner projects, like birds or sheep, is a great way to learn the techniques, but you'll develop your own method as you become more confident. If you want to start your project from the bottom and work up, or from the top and work down, it doesn't matter. As long as you can create the desired effect for your project and finish with a felted item that pleases you, then you've found a "right way" to felt!
I learned how to felt by making a couple of sheep and a whole grouping of miniature, local songbirds. My sister made wire legs for the birds and put them on a metal "jewelry tree". While my Mom just loves her bird tree, I realized then that felting birds was not for me. I loved felting, but making animals did not inspire me at all. As soon as I made my first doll, I was totally "hooked". Don't be afraid to try felting several different types of projects as a beginner. That way, you'll find the style and type of felting that appeals to you.

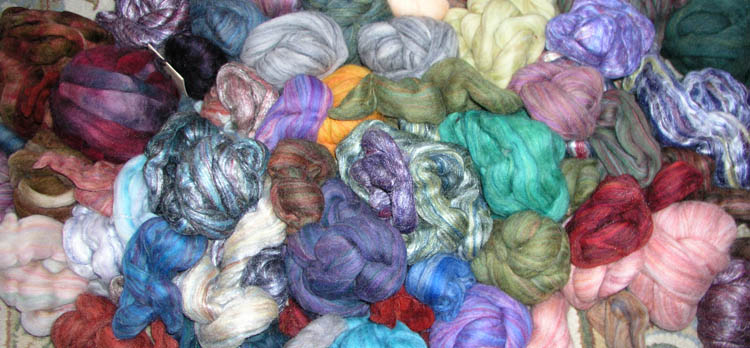
Basic Needle-Felting Supplies
When it comes to the basic supplies, I have bought some of my tools online and some at "Hobby Lobby" (a big craft-store chain in the Midwest). For the ease of online buying, I am putting Amazon links here to many of the items which I use. Felting tools are all a matter of preference and style, so each felter will want to decide what tools appeal to them and where they'd like to buy them.
Felting Needles: These are the basic requirement for felting. As the name implies, you cannot needle felt without the felting needles. Some craft stores sell packs of four or eight needles (usually by a company called "Clover"), but I have always found these to be very inferior in quality. They break almost immediately. Personally, I really like the needles sold by a website called "Between and Etc.". They sell a variety of needle sizes, and you can buy sample packs, which make it possible to try the different sizes. Each gauge of needle can also be purchased in packs of 50.
Felting needles are made by gauge size. The Between and Etc. webpage has a great explanation to help you decide which needle size is good for your project or felting style. The higher the number, the finer the needle. Personally, I use very fine needles. I felt an entire doll using .40 and .42 gauge needles. These needles are "extra fine" and "ultra fine" needles, meant for use on silks, etc., but I use them on 3D wool projects all the time. The finer the needle, the longer it takes to actually felt the wool, so it makes the project take a little longer. The pro to using the finer needles, though, is that the "holes" in the felted wool are smaller and not as noticeable.
What holes? Felted projects always have needle holes in them. By using the finer needles and not "over felting", however, you shouldn't notice the holes. You'll figure out how all of that works as you make multiple projects. I used very large needles on my first few gnome dolls, and one of them looks like he had a bad case of small pox. The Between and Etc. website sells a sample pack of all the different needle sizes. I would recommend getting something like that first, since you really want to decide on a size of needle that fits your style and roving. Roving has a great deal to do with the look and quality of your finished project. Coarser roving will give you a more "woolly" (or "country") look. Finer roving will give you a smoother and firmer look. Scroll down for more information about different fibers.
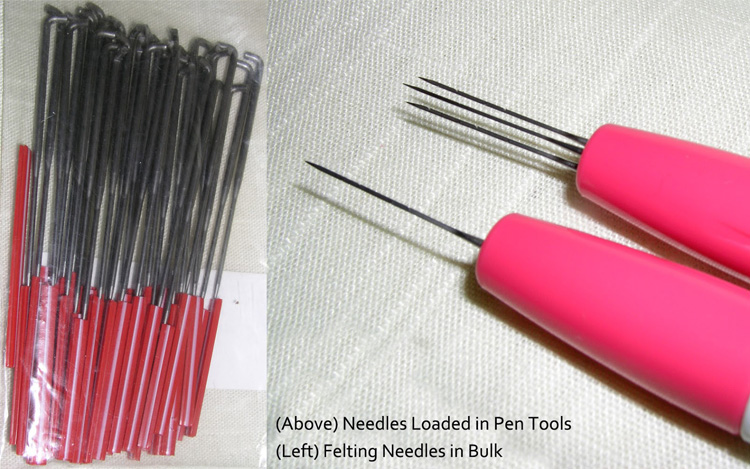
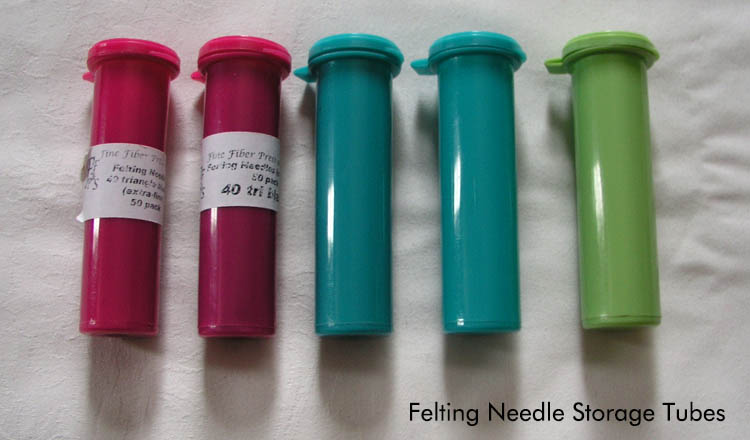
Felting Needle Storage
There are all types of options for storing your felting needles. If you've ordered from the shop listed above, the needles will come in a plastic bag (as shown in the photo) with each needle inserted into a protective plastic strip. This protects the needles from breaking and you from stabbing yourself! You may choose to leave the needles in a drawer or box as they come, or you could put them into any container that seems appropriate and easy to access. My personal preference is to keep them separated by size. At all of the large craft store chains in the area (this includes JoAnn's, Hobby Lobby and Pat Catan's ), I have been able to find these nifty plastic tube containers. They come in a variety of colours, so I pick a different colour for each size of felting needle. I also have one tube of a totally different and unmistakable colour that serves as the "broken needle receptacle". When a felting needle breaks, it always snaps into two pieces, and it can be dangerous to just throw those shards into a trash bag. I collect them in a container and dispose of them in a group by putting them into a box or something that won't break through a garbage bag.
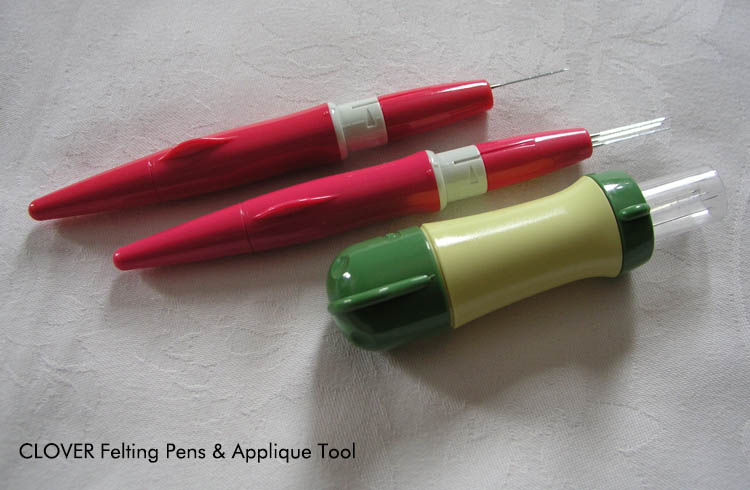
Felting Needle Holder/Pen
Each person has to make their own decision about felting tools. It is a matter of deciding what works best for you. Basically, you need fiber, needles and some kind of pad or cushion for your project to sit on while being felted. The following explanations will tell you where to start and what works for me.
You can felt by just holding the needle itself, since it does have a sort of long "hooked" top on it, but I prefer to use a "felting pen". This is a tool that holds one, two or three needles at a time. It looks like a plastic pen and offers better leverage during the felting process. In my opinion, it also saves you from poking your own fingers too often! The pen that I use is the Clover Needle-Felting Pen. There are quite a lot of needle holders available, so don't be afraid to look online for other types. If you're interested in an applique needle holder (five or more needles working at one time), there is a Clover Applique Tool available.
Felting Pad Options
You have to have some kind of a pad to felt into. This gives you a way to poke the needle all the way through your project without breaking the tip when the needle comes out the back of the wool. Everyone has a different method for this, and it's another personal-preference issue. Some people use a pillow or a piece of foam. I don't like either of these options, because it seems to me that the foam or pillow stuffing comes up into your project by sticking to the barbs on the needle. (You also have to replace the foam quite often, and a pillow takes up a lot of space when not in use.)
Personally, I like to use the Large Clover Felting Mat. It looks like a rather large nylon brush pad. You may have to replace the mat eventually, but it lasts a long time. I made twenty-one dolls and all of my beginning projects on one pad, before thinking that I'd need to replace it. Even then, I found out that I was able to use a bamboo skewer to clean the vast amount of wool bits that had collected at the bottom of the mat. After working at that for an evening, I still use the old mat! The bristles have turned a darker color from the various dyes on the wool, but this doesn't affect the pieces at all. For any pure white or pale skin tone pieces that I am working on, I use a separate mat that keeps any small hairs of coloured wool from accidentally creeping into the pale pieces.

The Clover mat comes in two sizes, but if you plan on making anything larger than a very small project, I would recommend the larger option. (Actually, when I'm in the middle of some real intense detail, I find that the arm of a padded chair works very well as a mat to keep your project steady. Not a suggested method but effective. I've often considered finding a great vintage chair with those fabulous flat padded arms and designating it as my felting chair. Just a matter of floor space, really.)
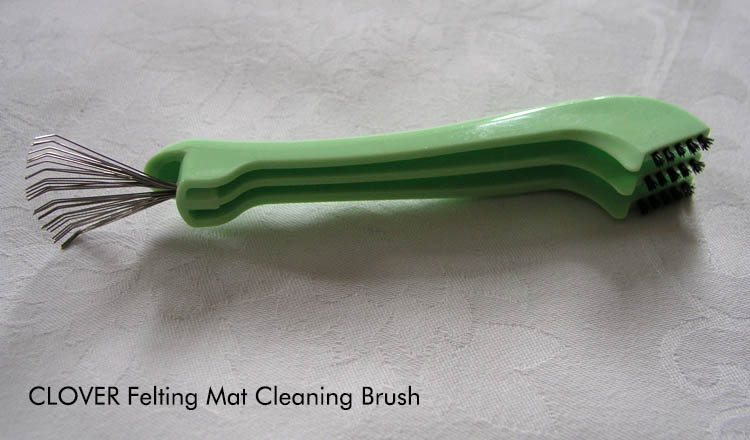
If you decide to go with the felting mat, then I would recommend purchasing the Clover Claw and Mat Cleaner tool. I really like this product, because it removes all the remnants and dust of the wool from your mat. This is particularly helpful when changing roving colors in the middle of a project.
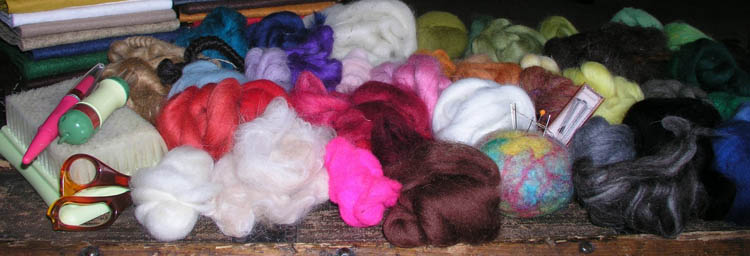
Wool
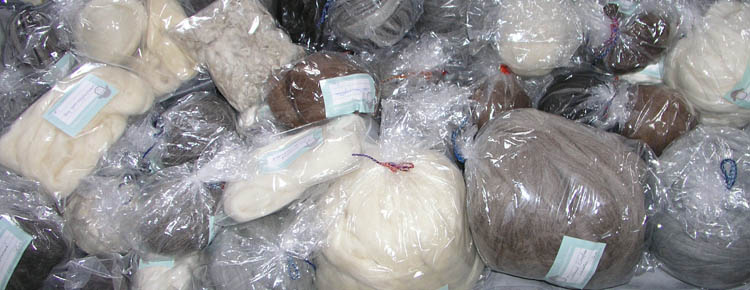
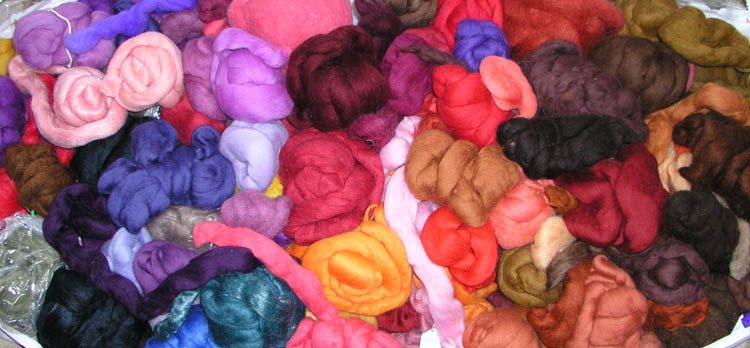
Depending on where you live, buying fiber will be easy or tricky. Craft stores usually have very small balls of colored wool available in the felting section, but I don't recommend them. I used quite a lot of it at first, but its processing leaves an inferior, poor-quality product. After about a year, unused portions begin to harden and actually disintegrate to a powder. So, you have to wonder how long your finished piece is going to last.
Depending on the type of project you're planning, you may want natural fiber or processed (or a mix of the two). Different people prefer different types of wool. Many recommend Romney, Corriedale and other coarse wools which felt very quickly, cutting down the time invested on a project. There are times when these coarser fibers give a more desirable effect in a project (e.g., animals), but I generally like felting with processed Merino roving for my dolls. While no one recommends Merino for felting, they all admit that it's beautiful and comes in the best variety of colors. Merino fiber, however, has a long staple length and fine texture, so it takes longer to felt. It does make for a finer overall finish when completed, though. The felted piece looks clean and smooth and doesn't have as much of the "woolly" look as the coarser fibers produce. It all depends on what you're making, and you want to shop with this in mind.
I buy almost all of my wool from Bullens Wullens, a fiber dealer in Ohio. She carries a large color-selection of my preferred Merino roving, made by Ashland Bay, a company located in Oregon, USA. They offer a variety of colors, and their roving is consistent in quality and color from one lot to another. I have some colors which I purchased two years apart, and you can't tell the difference. This roving is readily available from various online stores/websites and will be worth your effort to locate. Over the years, Ashland Bay has discontinued a number of wonderful colors, so don't hesitate to purchase one that isn't on the current list. (In fact, I'm always scouting around for those.)
If you would like to experiment with various natural wool varieties or even try dyeing your own colors, then a great place to purchase an amazing variety of wools is Laughing Lamb Fibers in Colorado. They have reasonable shipping and sell by the ounce. Fabulous choices, and I can't recommend them enough.
The greatest way to find fiber is at local "fiber shows". Of course, shows will be easier to find depending on where you live. This is a nice Fiber Show list, broken down by regions of the United States, but there are a lot of smaller shows not listed here. Don't be afraid to do some looking for your particular area. People from different fiber mills or farms bring wool and fiber in all states and forms to these shows. You'll find things that you didn't know you needed and are not available online. Fiber shows are also a nice way to see different breeds of fiber and get a feel for what appeals to you for your own projects and style. While Ashland Bay is my personal favorite, I often use other types of rovings to achieve a different effect when the piece calls for it. And fiber shows are a great way for me to pick these up.
Skin Tone
Skin tone is one of the hardest "colors" to find in wool roving. I had to card two colors of Merino roving for the first number of felted gnomes which I made. This was effective but difficult in any of the fine feature areas. One small fiber of a different color shows up in a finished piece. In areas like noses and ears, the carded fibers were a little too visible for my liking. So, I don't card colors together for skin tone anymore.
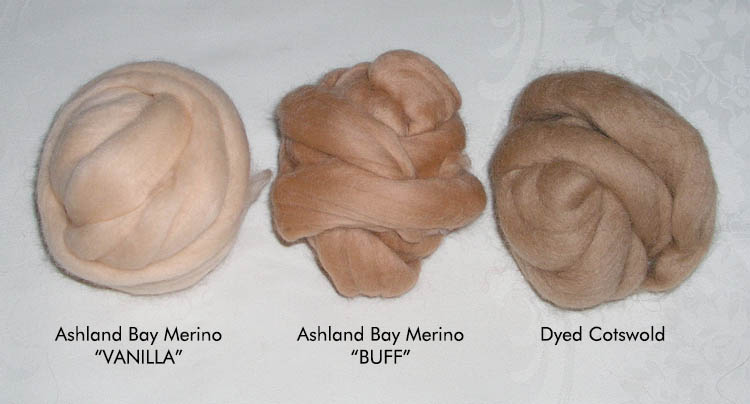
For the past several years, I have been using a very nice dyed Cotswold wool for the skintone on my dolls. The color is slightly "swarthy" in color, but it's natural looking in the finished doll. I get it from Big Springs Farm in Indiana (though they don't actually have a website). They experimented with different dye combinations to get a satisfying skin tone, and it's one of their regular colors at the fiber shows. The Cotswold wool felts very easily and rather quickly, and doesn't have as smooth a finished look as the Merino; but, until I can find a natural-looking Merino skin tone, this is quite satisfactory.
If your really want to use Merino skin tone, or you can't find something at a show (such as the Cotswold), then Ashland Bay offers two options that are decent. The palest option is called "Vanilla". I use this on all the Minikin doll faces and any of the 1:12 needle-felted dolls. You just can't achieve the tiny details like that with anything but Merino. They also have a darker and redder option called "Buff". It appears too red when felted into a project to my liking, but it may be just what you need. I did use it for the skin tone on the Indian Brave doll, so you can see what it looked like in those photos.
Mohair and Wool Doll Hair
When I started felting dolls five years ago, doll hair was much easier to find. Depending on the type of hair, style of doll, and the overall finished look that you are aiming for, the type of hair you use will vary.
Wool doll hair is easy to use, easy to find in a variety of shades, and fairly inexpensive. I have used All Cooped Up Curly-Crepe Wool Hair since I started making dolls. Their hair is totally consistent in color from one braid to the next, and you get a lot of hair from one 12" braid. When you pull the wool off of the twine, the hair shows as slightly wavy. There are ways to straighten it, if you need straight hair, but I have never had to do that. Most of their colors are quite realistic, but I was rather disappointed with "Blonde" (too yellow) and "Fox Red" (hot red and not a realistic hair color at all). Again, selecting fiber for your project will come down to a lot of personal preference.
Mohair doll hair is my personal preference. That said, it is harder to work with than the wool hair. Mohair felts onto wool very easily and quickly, but it's very easy to snarl or mat as you work with it. The finished effect of mohair looks very realistic, and (in my opinion) is quite worth the extra effort. Again, it depends on the finished look that you want. For the more "country" or rustic-looking projects, though, wool hair is usually better. Also, finding Mohair doll hair is getting much harder. I have never been able to find it at a fiber show, so I've always bought it online. Getting just the right color can be challenging, so looking at all of your options before ordering is wise.
I've had two different colors of Mohair from a store on Etsy called Angels by Noemi, though she does not always carry straight mohair. The brown and auburn which I bought were nice, so I assume that the rest of her colors would be worth trying. Apart from this one purchase, I've never bought multiple colors of Mohair Doll Hair from any one place, so you can see that it often takes a lot of time and effort to get just what you want.
Mohair Locks are, by far, my favorite doll hair, and I stock up on them at fiber shows in a variety of colors. They're angora-goat curls, generally ranging from one to four inches in length. You can find quite a few others selling locks like these online, but I like to deal with local people, when possible, and would encourage you to find small animal-owners in your area.